Final website
Github repository
YouTube video
In collaboration with Hasty.AI
Introduction
Data science projects typically follow a very model centric approach. Many of you may recognise the workflow of problem scoping —> finding a relevant dataset —> days adapting model architecture or hyperparameters to optimise performance to some metric. It's been tried and tested and in fact has yielded great advancements to date measured on benchmark datasets like ImageNet or COCO.
Despite these successes, recent explorations of some of the largest benchmark datasets to date have been found to contain systematic flaws. These are datasets which have trained literally thousands of computer vision models many of which are in deployment today. Within these deep dives, it was found that that "label errors are prevalent (3.4%) across benchmark ML test sets" which actually affects the perceived relative performance of models depending on the distribution of errors across the training and test sets.
With these flaws in mind what should we do? It is clearly sloppy to assume that these datasets are unusable or to chuck out all advancement to date. However, what if we did have more control over the nuances of the dataset? What if we could gain greater insight into how the data itself shapes the outcome?
The simple answer is we can. In fact for AI enterprises , it is custom datasets -aka data moats- that are the largest factor in defensibility, often more so than the model architecture. Within the computer vision world, the creation of these custom datasets are often outsourced which can be costly but saves significant time (plus labelling can become very onerous...). However, with this project we wanted to gain an insight into how the nuances of data can affect model outcome. We wanted to take a project right through from ideation/ raw images to deployment ourselves.
Therefore, we built a fun scorer that classifies objects in home office pictures e.g. plants, desks, laptops and then returns a score based on how well equipped the office is deemed to be. The stages that were gone through included compiling and labelling a dataset, creating a model on top of it and finally deploying it live. By leveraging the Hasty.AI platform alongside Streamlit, we go from raw images to a deployed model in a relatively simple process. While this project is grounded in a more fun example, all of the techniques employed can be applied to broader cases. Areas of particular interest would be social impact cases where localised datasets and models may be more effective than broad generic ones. The rest of this post outlines the steps that were taken and the key learnings at each stage.

Diving into the Data
Scraping images
The first step was finding the home office images to build the dataset. Rather than heading out and taking 100s of photos of home offices ourselves, we leveraged home office photos from Google images instead. This is a process made relatively simple using the "google_images_search" package in Python. This API allows for image searches and subsequent downloads from within a Python notebook - a lot faster than trying to download images one by one from a browser or perhaps building some form of web scraper. In building the dataset, some of the considerations that were considered have been listed below alongside how they were overcome.
- Variance in the image styles
To maximise the generalisability of the final deployed model, we needed to collate home offices with a range of different office objects inside. The greater the variety, in theory the better potential for the model to perform on an object outside of the training set (there are of course some post processing steps such as rotation/ inversion that also support in this respect as well). The great thing about using this API is that because it is directly from Google, it means we can search Google images directly to see the sorts of images that will be downloaded when using the API later. By following this method, we built up a combination of search terms ranging from 'unique home office' to 'well lit home office' to then use when downloading the images.
Note: The model currently still struggles with some random complex images containing random objects. While adjusting confidence score thresholds can handle it in some cases, it also demonstrates how much image variety is required to truly cover all edge cases.
- Copyrighted images
Ensuring that we are not infringing on copyright is very important when using images from Google. Fortunately, there's a filter option that can be used as part of the API which selects images based on the rights associated with them. In our case we will not be making the dataset public to ensure that there are no concerns. As a further point we recommend using the Unsplash website when trying to find images that can be freely used. - API usage limits
When using the Google image API there are free usage limits (found here), after which point you will be charged. To overcome this potential financial barrier, we conducted the scraping over several days meaning these limits turned out to be a pretty small barrier. However, it is something to keep in mind depending on the size of dataset you are trying to create.
!pip install Google-Images-Search
#import necessary requirements
from google_images_search import GoogleImagesSearch

gis = GoogleImagesSearch('your_dev_api_key', 'your_project_cx')

# define search params:
_search_params = {
    'q': 'unique home office',
    'num': 10,
		'rights': 'cc_publicdomain|cc_attribute|cc_sharealike|cc_noncommercial|cc_nonderived'
}
# this will search and download:
gis.search(search_params=_search_params, path_to_dir='/MyPath/images/')
Labelling images
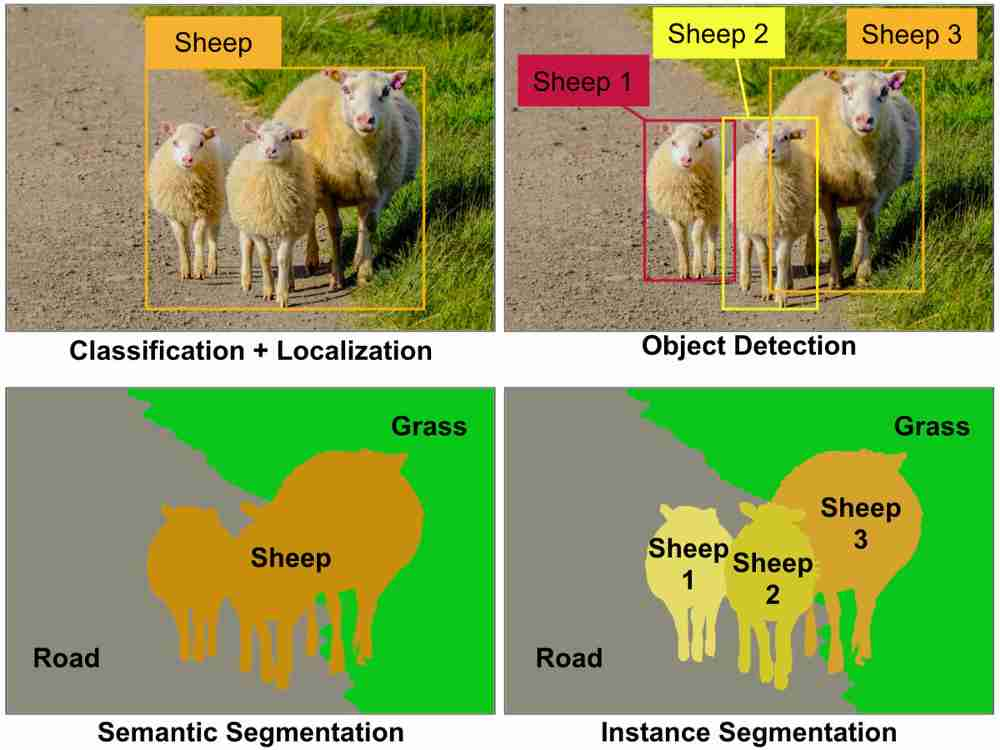
After having collated all the images, they were uploaded onto the Hasty platform where they could then be labelled. Not all images scraped via the Google API were of good quality but uploading them all onto the platform and then filtering on there was time saving - of course storage considerations must be broached with this approach. The overall computer vision task we were working towards in this case was instance segmentation. Instance segmentation allows for not only the classification of pixels as a class but it also allows for a number of instances of a same class. This is compared to semantic segmentation which purely labels a pixel as a certain class (see the image below). Instance segmentation also outperforms object classification especially for objects of varying size such as plants.
The video below demonstrates the key elements of labelling via this platform but as a summary: the platform allows for multiple classes to be created and then labelled using a paintbrush style or polygons. Furthermore, each class can then have sub-attributes like making a chair raiseable or not. Not all images uploaded have to be used which was very valuable given that not every image scraped from Google was of a high quality.
However, the main benefit of Hasty's platform is their AI assistance tool. The tool automatically trains neural networks as you label and then uses the trained network to make labelling suggestions. This gives you instant feedback into the models' performance while you annotate and not only after writing hundreds of lines of code.
It was very interesting to think about what a model may be fitting to when considering labelling a class a certain way. Interestingly, taking this data focused approach highlights just how much personal bias is embedded into a dataset e.g. Do you consider just the leaves to be the plant or should it be the leaves plus vase? How does this label choice affect the prediction accuracy of the model downstream?

Modelling
Following data collection and labelling, we then turned our attention to training the model. Hasty's default model, was doing a decent job already, but we wanted to customize it a bit more. So we used Hasty's 'Model Playground' to run some experiments without writing any code ourselves.
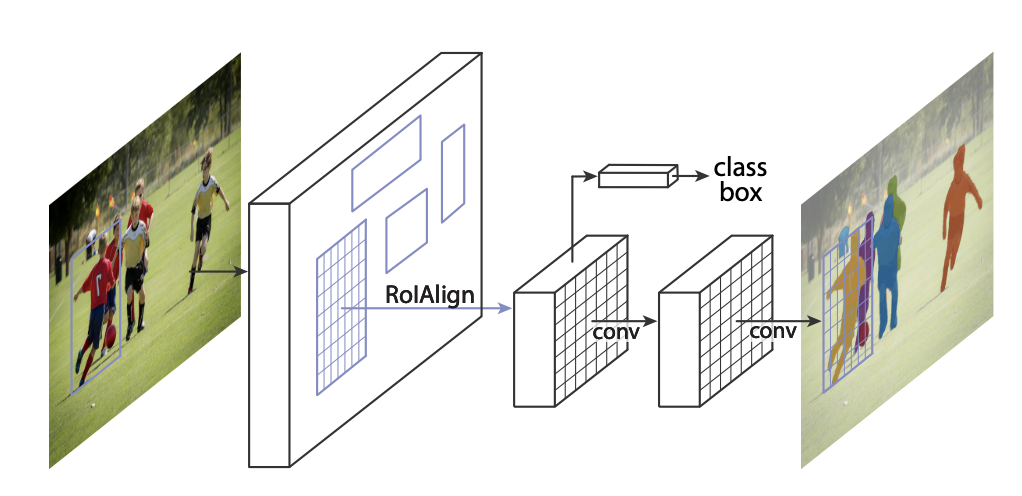
Note the focus of this exploration isn't to dive deeply into different modelling approaches such that the scope of the post isn't too wide. But to give you the key facts: after comparing different architectures, we ended up using Mask R-CNN which is one of the most common frameworks for instance segmentation. The network first computes bounding boxes for each object found in the image and then fully convolutional layers compute a mask for within each of these bounding boxes.
To speed up the training process, we leveraged the pretrained weights for the resnet FPN network which forms the backbone of the architecture. Here is a perfect example of the value that comes from these large prebuilt datasets while being able to create tailored use cases by fitting to our custom dataset. To explore the full possibilities of parameters, check out this page!
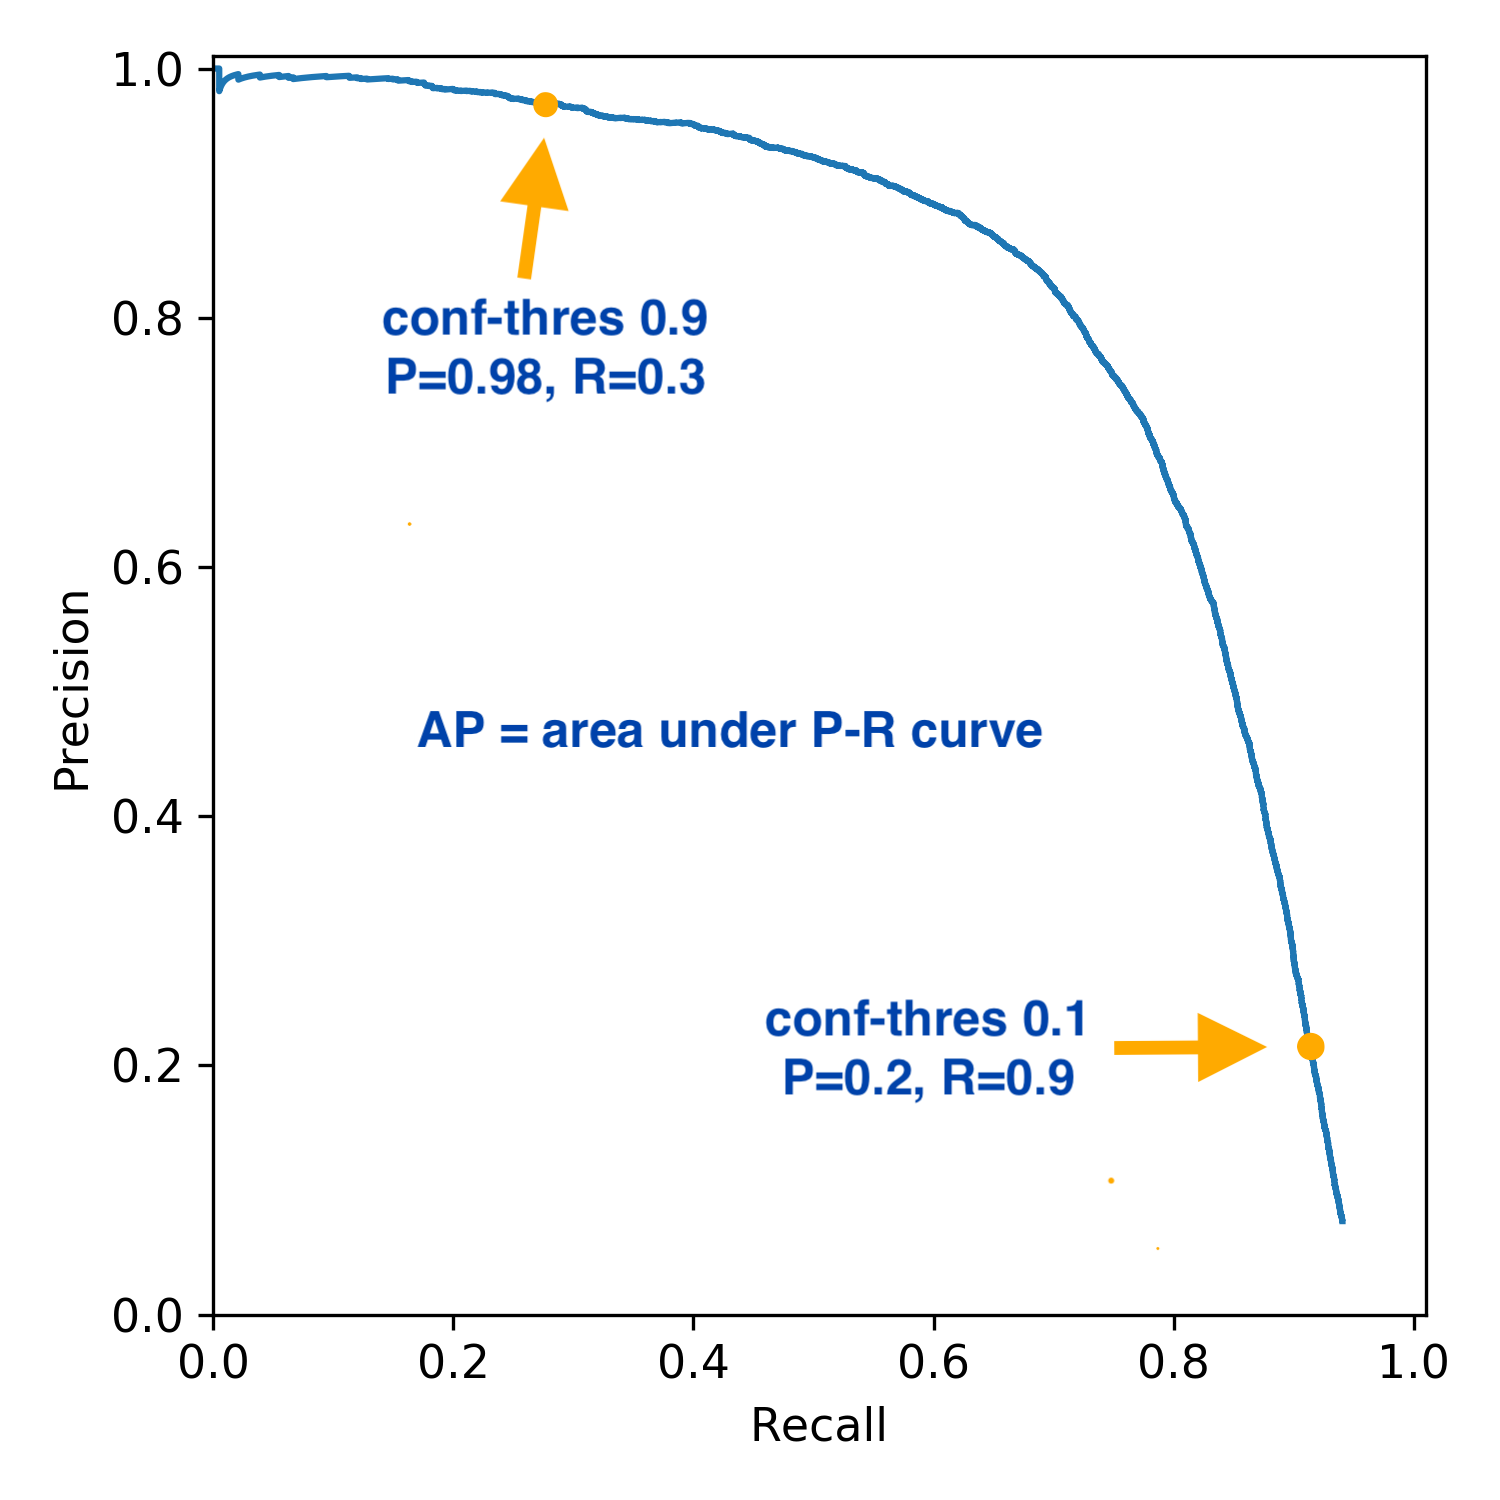
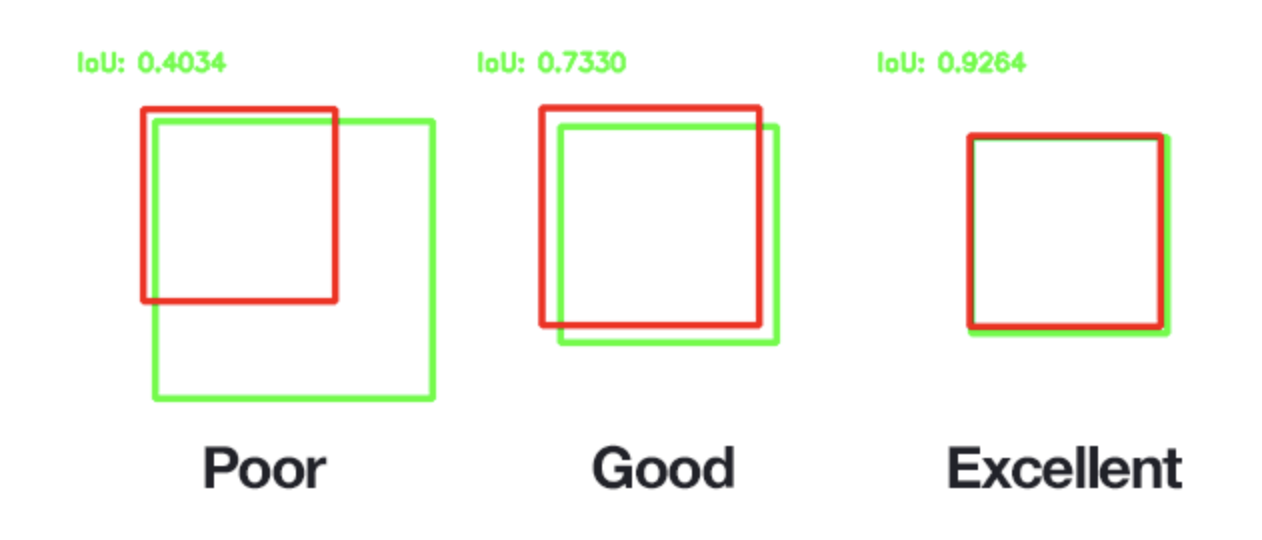
The evaluation metric used was mAP (mean Average Precision) which is a standard metric in the computer vision world. The mAP metric incorporates both precision and recall which makes it an effective metric even if there are class imbalances. mAP is often quoted for different IOU (intersection over union) thresholds where IOU is the threshold that must be beaten for an object to be denoted to a class as a true positive. The lower the IOU the more apparent true positives and therefore that will have a direct impact on the mAP metric.
Deployment using Streamlit
Now is a good point to do a brief recap of this blog. After defining our project ambitions we broke up the traditional data science workflow we described in the beginning. We already trained the first model while we were still annotating and used this model to assist with the labeling. This sped up the process immensely and gave us insights if our data strategy was working or not early on. Then, we fine-tuned this model.
Finally, it was time to deploy our trained model to a website. The model was exported from Hasty as a torchscript file. To see the direct implementation to deploy this type of file, check out the Github repository. The Streamlit platform offers a very easy way to deploy models to the public for free by simply plugging into your Github repository. Throughout this whole project it was quite fascinating to see the number of low code tools available for data scientists and this number is only growing.
Streamlit can also be run locally if desired and can even be run from Google Collab but that requires a slight bit of fiddling to get fully running. Despite training as an instance segmentation task, the final deployed model demonstrated uses the object detection bounding boxes. This is one of the benefits of the Mask R-CNN architecture as the bounding boxes have to be generated to compute the different instances which means the boxes are still there to be used as well.
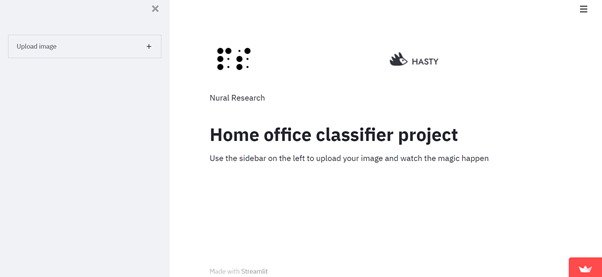
The Streamlit page is currently live and allows users to upload any home office image and receive a breakdown of the objects inside. The classifier is far from ideal with noticeable failings when strange non-home office images are uploaded. However, the aim of this project was to share process, learnings and inspiration and there has been plenty of that in this process. You can check out the final deployment here!
Conclusion
This project was designed to walkthrough the complete process of creating a data science project with a keen emphasis on the data used in the process. In doing so, we got to not only build a fun home office classifier but also gained several learnings throughout. There was a clear value in leveraging pretrained networks despite the creation of our dataset. This is widely used technique because these networks already know key elements of image and item structure.
So, now you have this workflow...what will YOU build next?
About Hasty.ai 🦔
Hasty.ai is an AgileML platform for building Vision AI-powered products. Annotate your image and video data, then build, optimize, and deploy your computer vision models into your product — faster and more reliably.
About Nural Research 😎
Nural Research is about exploring the power of AI in addressing global grand challenges. The group explores AI use to inspire collaboration between those researching AI/ ML algorithms and those implementing them. Check out the website for more information www.nural.cc